FB

Friday 6 January 2017

Whole wheat bread dough for pizzas, burgers, garlic bread and all things bread!!

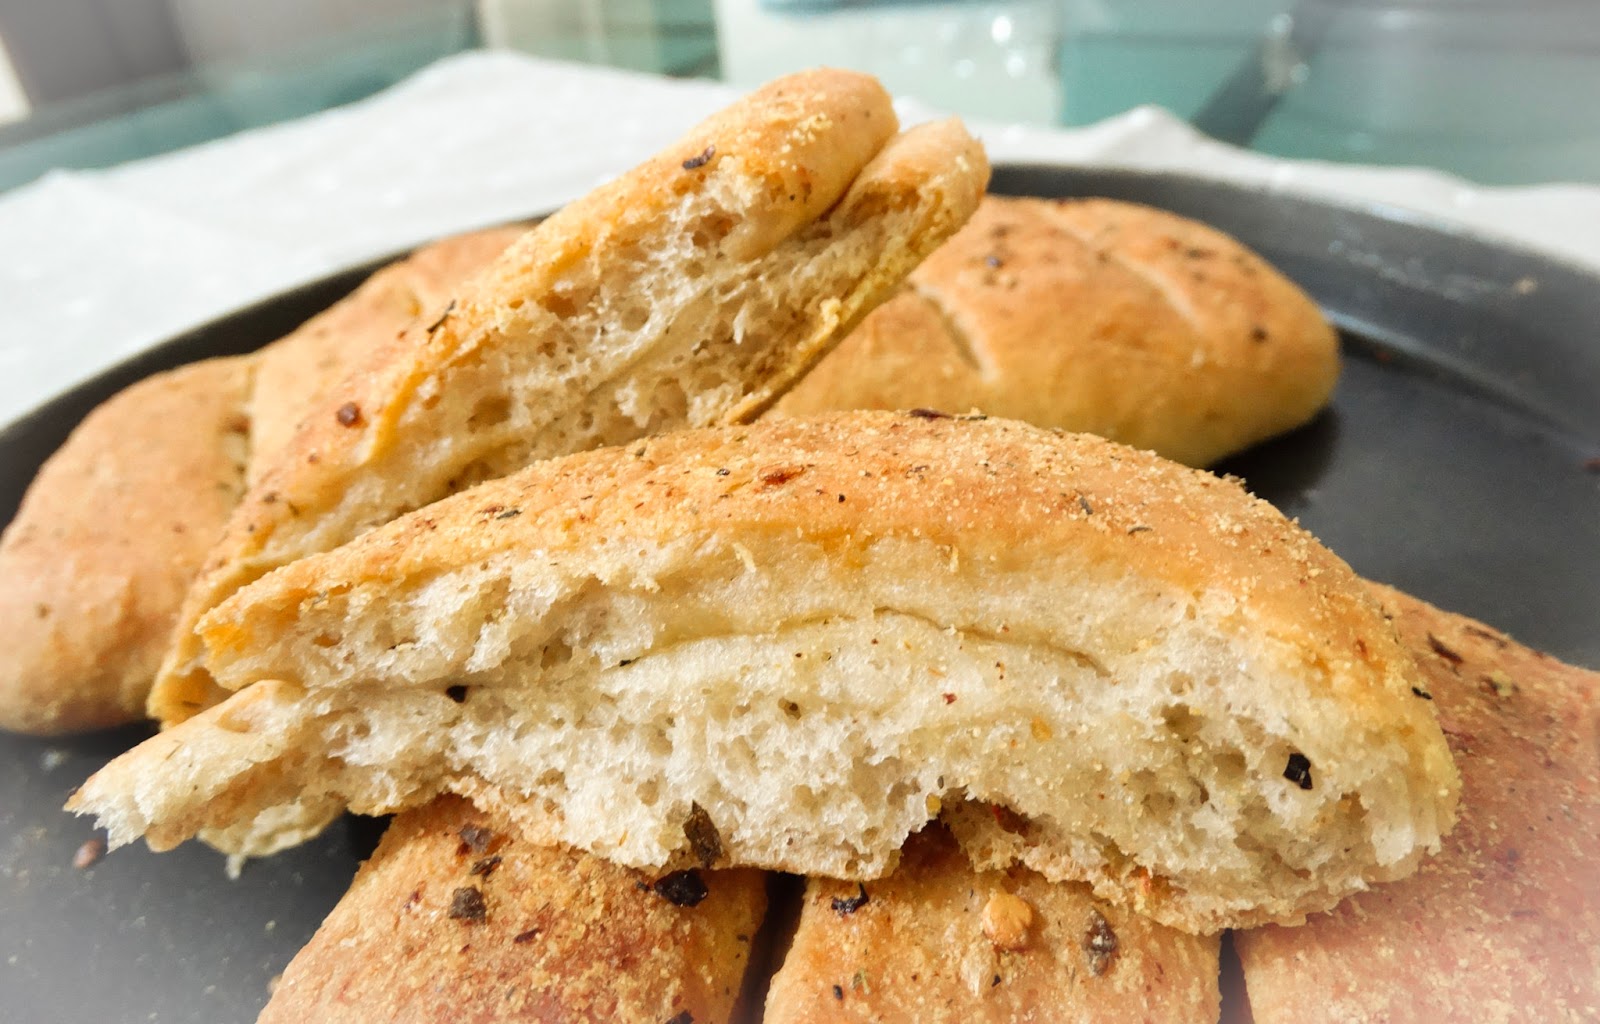
This is probably one of my most satisfying bakes in recent times because it is savoury. I have tried 100% whole wheat recipes in the past, they were good but a bit dense so this time gave 75% whole wheat and 25% all purpose flour a try.

Just by replacing 25% of whole wheat with all purpose flour it gave astounding results. I thank Namrata from Home baker's guild facebook group for this awesome recipe. My family's favourite is garlic bread. In fact, there is some dough in my fridge at all times. Garlic bread is ready in minutes whenever I feel like snacking. :-)

Here is the recipe for the dough!

What you need-

3 cups Whole Wheat flour
1 cup Maida/All purpose flour
1 1/2 tsp Active dry yeast
1 tsp Salt
1 tbsp Sugar
2 cups Luke warm Milk and water(50-50 ) mixture
3 tbsp Olive oil + Little more to grease hands for kneading

Dissolve sugar and yeast in 1 cup of lukewarm milk and water mixture and let it rest till it becomes frothy (approximately 10 minutes)
In a mixing bowl add wheat, maida, salt, olive oil, 1 cup of milk-water and mix well. Add yeast mixture and start kneading. Knead using stretch and fold method for about 15 minutes. It is going to be very sticky but dont get tempted to add flour. Grease your hands using olive oil to knead. You will find several videos on youtube to help you get an idea of kneading dough.

After 15 minutes of kneading, shape the dough in a round shape and keep it in a well greased bowl, preferably glass bowl and cover it loosely with a cling film. The dough will double in size in about 45 minutes to an hour or a little longer. Once the dough doubles in size, gently punch to release the air and knead for another 5 minutes.

Shape the dough to get pizzas, buns and other kinds of flat breads. Use filling and/or sauces and spices at the time of baking.
After shaping, filling and applying sauce, let it rest for about 30 minutes before baking.


For baking, preheat oven to 200 degrees C and bake for 15 minutes.

Here is how I made Dominoes style garlic bread-

What you need-

Butter
Cheese (Optional)

Spices-
Garlic powder or minced garlic
Sea salt
Oregano
Chilli flakes


Mix all spices.
After preparing the dough as explained above, take some dough and make a ball for roti.
Dust the surface with cornmeal or suji rava and make roti.
Apply butter in one half and sprinkle spice mix. Fold the roti to form semi circle.

Apply butter on top and sprinkle the spice mix.
Make incisions on the bread. Cover the pan loosely with a cling wrap or wet towel. Let it rest for 30 minutes. Picture below is just before baking. It doubled in size during 30 minutes time.


Bake for 15 minutes in a preheated oven at 200 degrees. If the bread has not browned enough then apply some more butter and bake for another 5 minutes. Sprinkle some cheese at the time of serving.

Enjoy guilt free crisp garlic bread :-)


Friday 30 December 2016

Peanut butter karela

There are two kinds of people, one who hate karela and second, whose favourite happens to be karela. Believe it or not, there is no middle way! Either you cant bear the sight of it or you love it to the point that they are your "favouritesttt"! I fall in the latter category. I love it in any form and so I keep experimenting with more and more flavours to go with it.

On most days, I hop my way around in the kitchen because of two little hands holding onto my legs so tight ensuring I don't get to move much. This is why I have come up with the quickest way to satiate my want for Karela. Here is the recipe.

Ingredients
250 gms tender karela (Bitter gourd)
2 heaped tsps peanut butter
Turmeric
5 garlic cloves minced
Salt to taste
5 curry leaves
2 tsp oil

Method
Finely chop karela, add a pinch of turmeric and salt. Boil it for one whistle in pressure cooker.
Let it cool down completely and then squeeze excess water.
Heat oil in a kadai, add curry leaves and garlic. Saute till garlic turns light brown.
Add karela and mix. Saute for 5 minutes and add peanut butter. Mix thoroughly. Check salt and add chilli powder if you wish to.

Saute for another 5 minutes and turn off the gas.

Enjoy peanut buttery karela (bitter gourd) with rice or chapati !!

ps - This is a great way to introduce karela to your kids too :-)


Wednesday 17 August 2016

Appam and Egg curry

The two best friends.. appam and egg curry. Although I love chicken, I still prefer egg curry with appam. This has been my favourite since childhood and now I get to finally pass on the "appammania" to my baby. My 10 months old baby had appam for the first time today and absolutely loved it. What more, he had egg curry too! Of coarse the curry was customised for him but tasted just as good as what I normally would make. 


Everyone has their own style of making appams with two things in common, rice and fresh coconut. I have also omitted baking soda and/or yeast as they turn out fairly bubbly after fermenting (just like dosa, idli)

Ingredients for Appam 

1 cup rice
2 cups coconut water
Tender coconut of one coconut
1 tsp sugar
Pinch of salt
Baking soda (Optional, for extra fluffiness)

Wash rice thoroughly and add coconut water to it. Leave it for fermenting for at least 6 hours. If you are planning for dinner then you can start the process in the morning. After 6 hours, grind the rice and coconut water along with tender coconut, sugar, salt.

Let it stand for another hour.

The batter should look like this.


If you want to add soda, do so just before making appams. The appams shown in the pictures do not have soda.

Traditionally, appams are made in appachetti which sadly I do not have :( tch tch. So I make them in regular non stick pan which is why the appams in the picture look flat. 


You need to make appams on medium heat. Ladle some batter on to the pan in the centre and gently spread in all directions. While pouring the batter, simmer the flame, then increase the flame to medium and cover with a lid for about 50 seconds. They don't usually stick to the pan but if they do then take few drops of oil on a tissue paper and wipe the pan before each use.

Most of us with the habit of making dosas will get tempted to add oil at the time of frying.. its actually not required but I myself ended up adding oil and then realised!


They are done when the sides start to come off from the pan. 

For that perfect white appam, do not flip the appam, also there is no need. I was being extra cautious because of the kid. 

Your appam is ready.. enjoy! :-)


Oh wait, you need egg curry too. So here is my baby friendly egg curry which tastes as good as normal egg curry.

If you don't eat eggs then vegetable stew, chole curry or soya chunks curry are good options.

Ingredients for Egg curry

4 Eggs
1 tsp ginger and garlic paste
2 onions finely chopped or pureed
3 tomatoes finely chopped or pureed
2 tsp coriander powder
Turmeric
Salt and chilli powder as per taste
2 tbsp oil or ghee

Heat oil in kadhai, add onions, ginger and garlic, fry till onions turn transparent. Add tomato and cook for 2 minutes. Add coriander powder, turmeric, salt, chilli powder and mix well. Add water till the gravy is completely under water. 

Simmer the flame. Break eggs into the gravy by leaving some gap between them. Do not mix or stir. Just cover the lid and let it cook for about 10 minutes. Remove the lid and cook till excess water evaporates.

Egg curry is ready!

Enjoy Appam and egg curry :-)


Some people have doubts about giving fermented food to babies. 
My answer is simple, if you are giving idli, dosa then you can give appam too. 

Sunday 7 August 2016

How to make chocolate ganache

So what is chocolate ganache?

It is a smooth mix of chocolate and cream which is widely used for cake icing, filling in pastries or a sauce to go with your ice cream or pancakes. Apart from chocolate and cream, it can sometimes also have sugar, cornstarch, glucose syrup. Sugar is mainly for enhancing the sweetness whereas cornstarch and glucose syrup gives the ganache a glossy look.

Ganache can be runny to extremely thick based on the cream to chocolate ratio. Thickness increases with amount of chocolate. Equal weights of cream and chocolate gives the perfect consistency for icing cakes easily. You can simply pour it on the cake and refrigerate for the ganache to set. It takes about 20 minutes. When icing with ganache, use it when its warm otherwise it starts to set. If its too hot it will simply run down, so it should be just warm.


The moment you add more chocolate than cream, the ganache wouldn't be of pouring consistency and you will have to use a spatula to spread it evenly across the cake. This type of thick ganache is generally used for making truffles.


The type of chocolate you are using will define the flavor of ganache. If I start talking about different types of chocolate, it can take up an entire blog, will do that some other time, just a brief overview for now..


There is real chocolate also called couverture and then there is compound chocolate which most of us use in baking. The difference is that the real chocolate has chocolate liquor and cocoa butter where as a compound chocolate has cocoa powder and vegetable fats. If you have baking chocolate lying in your refrigerator, go check what it is! Real chocolate is richer in taste because it is after all the real thing! Compound chocolate mimics a real chocolate. That being said, not many people can tell the difference so its okay to use compound, but you wont get that natural glossy finish that real chocolate gives. Well, there is a workaround for that too! Its called cornstarch or glucose syrup!!! I will share the recipe of glossy ganache using both chocolates.


Here is the chocolate that I use -


Enough said, now lets jump to the recipe!

Things/tools required-


1) Silicone spatula


2) Weighing scale 
- I can not do without this. Its one of the best and cheapest kitchen tools to invest in. I have this one.. my bro in law got me one of these in US. I have been using it for over 3 years now without any issues. It is available on Amazon India too, am hoping its the same one and not a duplicate - http://www.amazon.in/Bulfyss-Electronic-Kitchen-Digital-Weighing/dp/B00MKA9WXO/ref=sr_1_1?rps=1&ie=UTF8&qid=1469983350&sr=8-1&keywords=kitchen+weighing+scale


Lets get started with chocolate ganache!

First things first, taste your chocolate, if its sweet enough for you then omit sugar or add sugar as per taste. If you are true chocolate fan, go for dark chocolate (at least 75%)


Ingredients (With Couverture aka real chocolate. Sufficient for 9" cake icing)

100 gms chocolate
100 gms cream (I use Amul cream)
Sugar (Optional, as per taste. Preferably powdered)

Melting chocolate in microwave-

Chop the chocolate into really tiny pieces and heat in microwave in short intervals. Initially 15 seconds, until the chocolate begins to melt. Then 10 seconds until it melts completely. After every interval, mix the chocolate using silicone spatula to ensure even distribution of heat. Uneven heat can result in chocolate getting burnt.
[ps: Burnt chocolate doesn't turn black in color, it seizes and doesn't melt anymore.]

Heat the cream until bubbles appear around the corners (boiling is not required). Stay close and turn

off the heat as soon as the bubbles appear. Add sugar and mix thoroughly.

Pour the cream into the chocolate and mix thoroughly using silicone spatula. I stress on silicone spatula because its much more convenient when working with chocolate or any other icing.


Once cream and chocolate have blended, what you have is Ganache.

Set aside until the temperature is a little over room temperature. You need to be present through out the process as it happens all too quickly.

The cake should be at room temperature.


Once ganache is warm, you can pour it on top first and then on the side by turning the cake as you pour. Refrigerate for about 20 minutes. Your ganache cake is ready :-)


Note: Ganache made from real chocolate is naturally glossy.


Storage and re-use is discussed in the end.


Ingredients (Using compound chocolate. Sufficient for 9" cake icing)

100 gms chocolate
100 gms cream (I use Amul cream)
2 tbsp Light corn syrup
Sugar (Optional, as per taste)

All steps are same as with real chocolate. You just need to heat the cream and corn syrup together before adding to chocolate.


Left over ganache can be refrigerated and reused by heating in microwave at short intervals.


Please visit this link for basic cake decoration tips.

Basic cake decoration tips

Continuing with my previous blog on eggless sprouted wheat flour chocolate cake.. here is how I decorated the cake. 

First off, steps involved-


1) Choose the type of icing. Broadly speaking, there are 2 types of icing. One is buttercream and the other is chocolate ganache. You can produce hundreds of varieties in each one of them or even mixing the two. I am not much of a cream fan, so I prefer chocolate ganache, but I do sometimes use buttercream for crumb coat (Step 2).


Other than these two, there are several other yummy icings like cream cheese variations, fruit compote (different berries or in combination).


2) Crumb coat - Not all decorators do this but I swear by it. Crumb coat, also called dirty coat helps in giving a smooth finish to your decoration. It is a thin layer of coat on cake just after it has cooled down completely. After coating, refrigerate the cake for about 20 minutes to set the coating. What it does is, it forms a layer between cake and your final icing, so the end result doesn't look uneven and it also keeps the cake crumbs in check.


Q: How to do a crumb coat?

A: Buttercream frosting is  most commonly used icing for crumb coating. However, I prefer using chocolate ganache if my final coat is going to be ganache.

Please follow this link for making ganache.


Things/tools required for decorating the cake -


1) Offset Spatula - Spreads the icing evenly. You may not need it if you are using a 1:1 ganache (refer to the above link for ganache recipe).


2) Bread knife -  You will need this if you plan to slice your cake horizontally for filling in between. This is the trickiest part.. I saw lots of youtube videos and ruined couple of cakes before finally getting it right. Of all the videos I saw, found this pretty useful - http://www.jamieoliver.com/videos/how-to-cut-a-cake-into-three-jamie-s-comfort-food-kerryann-dunlop/ I am a huge Jamie Oliver fan, which explains why this video :D


Only thing I did differently was using a longer bread knife (12") as I find it more convenient.

Common mistake people make first time is cutting cake with uneven height, so you start in the middle but somewhere you go tangential (either up or down) instead of going straight. Toothpick technique in the video gives you precision as you come across markers on the way.

Start with small cakes, say 4" and go up.


3) Cake turn table (Optional) - Convenient way to look at all sides of cakes while decorating as the table rotates. For basic icing using ganache it is not required.


4) Plastic cake box - for safe storage in refrigerator. If you are serious about cake decorations, invest in good plastic cake boxes to keep your cakes safe when kept in refrigerator, specially after icing. Plain cake can be stored in the same baking tin it was baked in. Just cover it using cling film.


Lets get started with decorating our cake!!


The cake in pictures was for someone who loves Indian sweets so the middle layer has homemade mawa peda. You can use ganache, buttercream, cream cheese, your favourite jam like apricot or berries, a fruit compote or anything you like.


Turn the cake upside down (flat side up) and slice the cake in 2 halves horizontally. 


For making mawa peda you need -


200 gms khoya or mawa  ( For a generous layer in 9" cake )

Sugar as per taste

Bring mawa to room temperature and crumble it with hands. Add it to a hot pan on low heat. Keep stirring continuously. Once it melts, add sugar and continue stirring till sugar dissolves completely. 

Turn off the heat.
Home made mawa peda is ready!


Spread a layer of homemade mawa peda on bottom slice and put the other half on top. Refrigerate the cake for an hour. 


Time for crumb coating..

I used 2 parts chocolate with 1 part cream ganache for the crumb coating. In my experience, thick ganache covers the cake crumbs effectively. Check out the picture of cake after crumb coating. After the crumb coat, refrigerate the cake for an hour for the ganache to set.


Now for the final step.. get your ganache ready. As mentioned in the recipe, it should be warm to make the pouring easy. You will know when its ready. Keep a wire rack on large tray or plate and place the cake on the wire rack. Pour the ganache in the centre until it slides down to cover the sides completely. Let it stand until excess ganache drips onto the tray. Carefully lift the cake and place it on a cake base and finally into the cake box. Refrigerate until use.

I have sprinkled caramelised almond flakes on top.


Recipe for making caramelised almonds - 

100 gms almonds
50 gms sugar (Half the amount of almonds)
2 tbsp butter

Add everything in a hot pan and stir until almonds get coated with thick caramel. Pour onto a baking sheet and let it rest until it becomes hard and crispy.

Roughly chop the almonds in a food processor or use a mortar pestle.  Sprinkle on the cake and press gently. 

Hope you liked the post! Looking forward to your feedback.

Happy cake decorating :-)